
Loading...
Loading...
Loading...
Loading...
Loading...
Loading...
Loading...
Loading...
Loading...
Loading...
Loading...
Loading...
Loading...
Loading...
Loading...
Loading...
Loading...
Loading...
Loading...
Loading...
Loading...
Loading...
Loading...
Loading...
Loading...
Loading...
Loading...
Loading...
Loading...
Here's a step-by-step guide to running some Autonomi nodes for the first time, and contributing your spare computer resources to the Network:
Here's how to offer your spare resources to the Autonomi Network, and contribute to the autonomous and decentralised alternative to the cloud…
Starting a node (or even several) is easy, and will work on home computers just like yours. Here's how:
Windows (Windows 10+)
Mac (MacOS 14 Sonoma)
Linux ARM (Ubuntu 24.04)
Linux x86-64 (Ubuntu 24.04)
Our step-by-step guide will walk your through each step of getting nodes running your computer.
Upgrades to the Network are made periodically. There's a simple procedure to follow when an update is announced and you are asked to upgrade your nodes to the latest version
Make sure you have the , and open it.
Press O to open the Options Screen
Press Ctrl + U and then Enter to begin the upgrade
Upgrading can take several minutes for each node. Please don't close the app or stop your nodes during this process.
Your nodes will then stop
Notice they have been upgraded to the latest version
Start your nodes again by pressing Ctrl + S
If you are a power user utilizing our CLI tool and want to upgrade your nodes to the latest version, first make sure you have the latest version of the Node Manger with the command:
Then, to begin upgrading your nodes, use the command:
Using the --interval 60000 argument will leave 60 seconds pause between upgrading each of your nodes. This is recommended for people running up to 50 nodes.
If you are running more than 50 nodes we'd recommend a longer interval of 90000 or more.
Once upgraded run the command antctl start --interval 60000
antup updateantctl upgrade --interval 60000Unzip the download
Right-click on the app called node-launchpad and click Run as administrator
Windows will warn you about an unrecognized app. Click More Info and then Run anyway
The Node Launchpad will now open in a terminal window.
Press O to go to the Options screen.
Press Ctrl + B to in order to add your wallet address.
You’ll be prompted to accept the Terms & Conditions. Have a read, and if you are happy to continue Press Y.
Paste in your Wallet Address, and then Press Enter.
Now Press S to go back to the Status Screen.
Then Press Ctrl + G to start some nodes.
Press the up and down arrows to choose the number of nodes you want to start, then Press Enter to start them. We’d recommend you start just one or two to begin. Each will use 35GB of storage space, some memory, CPU, and some of your internet connection. Then add more as your resources allow.
You’ll see the node(s) you’ve started appear in a list. They may take a few moments to start, but when they do they’ll turn green. They will be gathering data, then serving it to the Network. If you’ve added several nodes, you can scroll the list with the up and down arrow keys.
You’ll see the amount of storage space allocated, and the amount of tokens, or attos, they have earned in the Device Status panel.
Congratulations! You are up and running, and contributing to the Autonomi Network.
Bumping up against some issues? Here are some guides to get to the bottom of some common problems:
Unzip the download
Right-click on the app called node-launchpad and click Open
You may see a warning which says “node-launchpad can’t be opened because the identity of the developer cannot be confirmed”. It’s ok, just click Open, and continue
The Node Launchpad will now open in a terminal window.
Press O to go to the Options screen.
Press Ctrl + B to in order to add your wallet address.
You’ll be prompted to accept the . Have a read, and if you are happy to continue Press Y.
Paste in your Address, and then Press Enter.
Now Press S to go back to the Status Screen
Then Press Ctrl + G to start some nodes.
Press the up and down arrows to choose the number of nodes you want to start, then Press Enter to start them. We’d recommend you start just one or two to begin. Each will use 35GB of storage space, some memory, CPU, and some of your internet connection. Then add more as your resources allow.
You’ll see the node(s) you’ve started appear in a list. They may take a few moments to start, but when they do they’ll turn green. They will be gathering data, then serving it to the Network. If you’ve added several nodes, you can scroll the list with the up and down arrow keys.
You’ll see the amount of storage space allocated, and the amount of tokens, or , they have earned in the Device Status panel.
Congratulations! You are up and running, and contributing to the Autonomi Network.
Find out how to…
Making hidden files viewable is easy, follow this guide for Windows
Start by opening File Explorer and navigating to the View tab
Now click Options
Navigate to the View tab
Now click the box that says Show hidden files, folders, or drives, and proceed to select Apply then OK.
You can now see hidden files. You can see hidden files now appear dulled
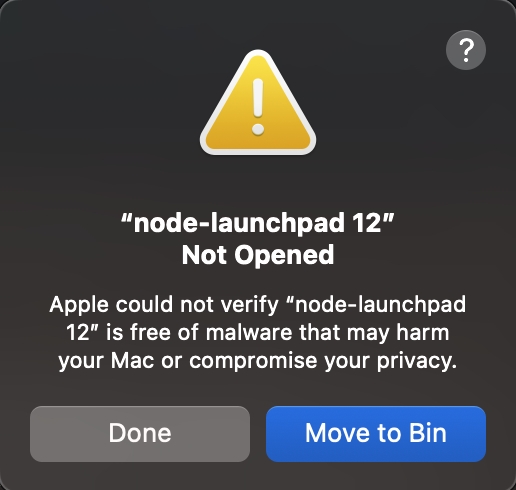
When downloading the launchpad, some Mac users come into a security issue in which they can not open the file, but this is a easy fix.
Go to your Mac's System Settings
Navigate to Privacy & Security
Click Open Anyway to confirm you want to open the file despite the warning
Sometimes software runs into hiccups and needs to be run as an Administrator to work properly on Windows. Here is how to do that.
Right click the node-launchpad.exe file
Click Properties
Navigate to the Compatibility tab on the top
Under Settings, check Run this program as an administrator
Click Apply
Click OK
The node-launchpad.exe will now run the program as an administrator my default
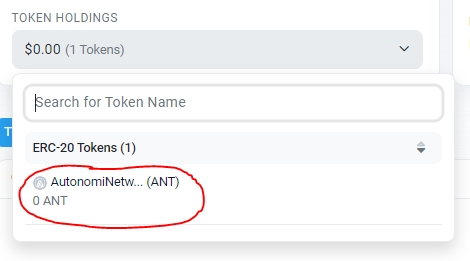
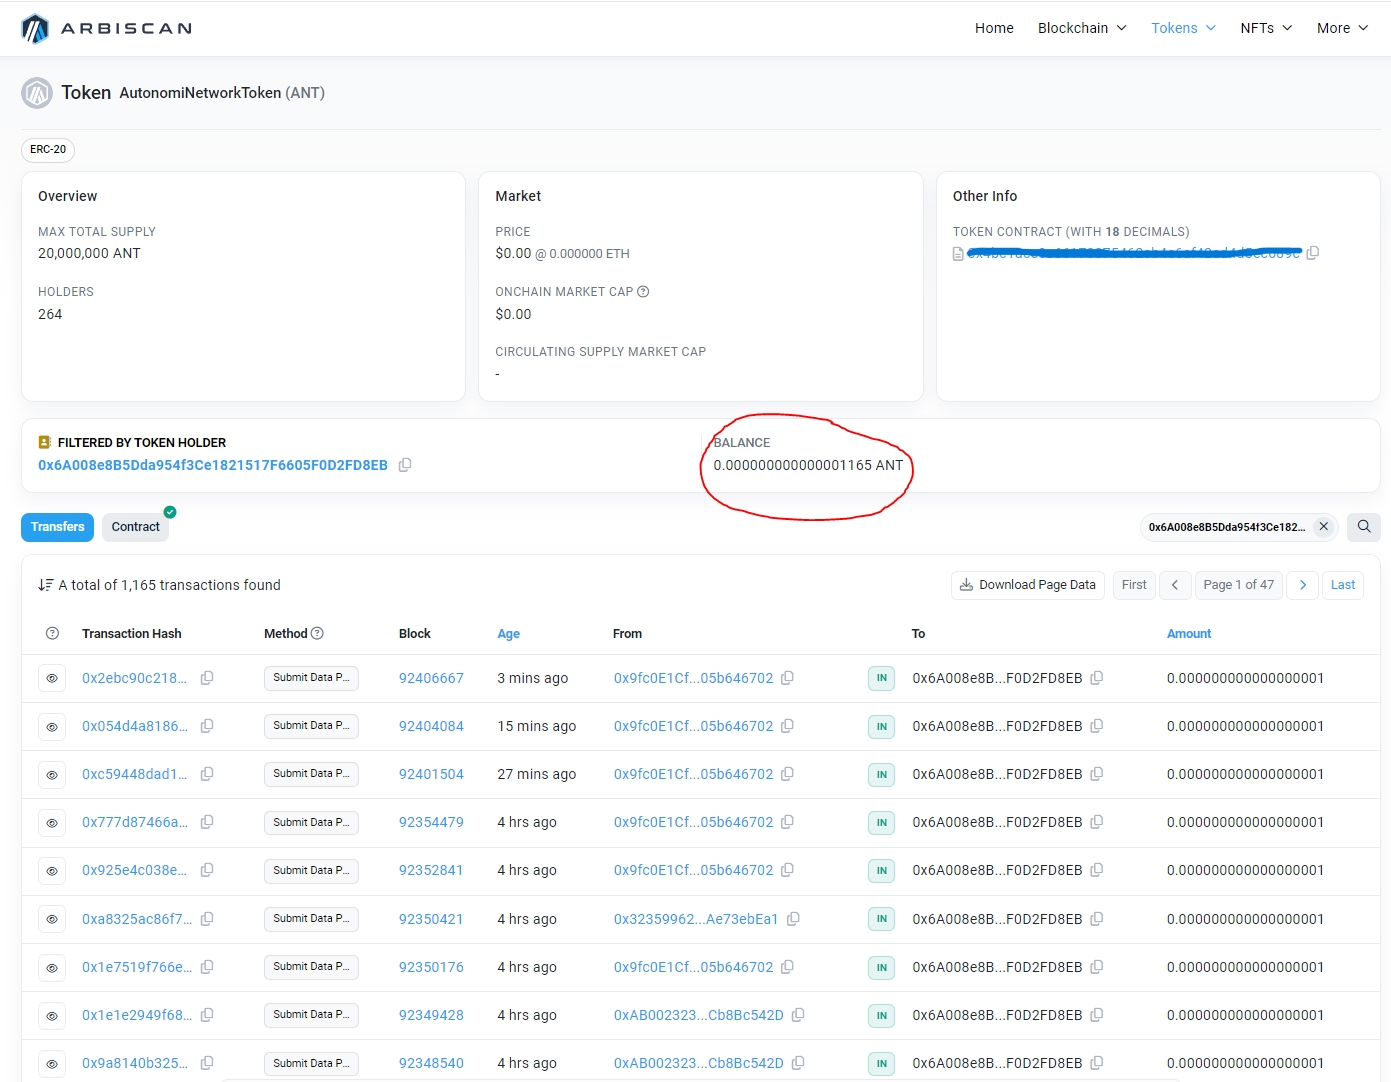
If you are having trouble viewing your ANT balance with in MetaMask, or in the Node Launchpad, you can check them on the block explorer. Here's how to do that
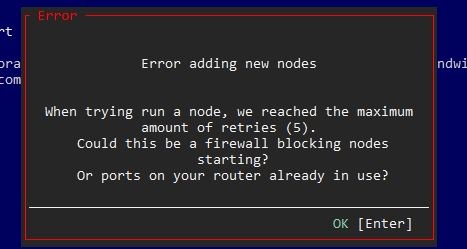
Some Linux users are receiving the "Error adding new nodes. When trying run a node, we reached the maximum amount of retries (5)."
Launchpad is designed to create a non-root ant user to manage node processes and store node data under the current user's ~/.local If you run as root, the structure gets created under /root/.local . The ant user does not have access to that directory, so the nodes cant start
You must run as root OR add a secondary hard drive or use another directory. Mount it and set permissions so that the ant user can access it. In LP, configure it to use the alternate path for nodes.
Here is a list of common acronyms you may hear with their explanations. If you hear terminology you don't understand, Discord and the forum are great places to ask for clarification!
ARB (Arbitrium): A popular Ethereum Layer 2 scaling solution that improves transaction speed and reduces costs by processing transactions off-chain.
CEX (Centralized Exchange): An exchange that is run by a company or organization that controls the platform, facilitates crypto trading, and manages user transactions.
dApp (Decentralized Application): Applications built to run on a decentralized network, such as Autonomi, that operate without a central authority.
ERC-20 (Ethereum Request for Comment 20): A widely adopted technical standard for creating and issuing tokens on the Ethereum blockchain. ERC-20 tokens are interoperable with Ethereum's ecosystem and are the foundation for many dApps. This is the tech standard used for eMAID and the upcoming Autonomi token.
ETH (Ethereum): A leading blockchain platform that supports smart contracts and dApps, with Ether (ETH) being its native cryptocurrency.
EVM (Ethereum Virtual Machine): The environment in which all Ethereum smart contracts and dApps run, executing decentralized code as part of the Ethereum blockchain. It ensures consistency and enables interoperability across different Ethereum-compatible networks (such as ARB).
ICO (Initial Coin Offering): A fundraising mechanism in which a company or project offers new cryptocurrencies or tokens to investors in exchange for established cryptocurrencies (such as Bitcoin or Ethereum) or fiat money. In the case of Autonomi, the ICO was the MaidSafe crowdsale back in April 2014.
MM (MetaMask): A popular cryptocurrency wallet and gateway to decentralized applications (dApps) that allows users to manage, store, and trade their digital assets securely. Including Autonomi's Network Token.
TGE (Token Generation Event): The moment when a project's tokens are created and distributed to investors and participants. For Autonomi, this is scheduled to take place on the 6th of February 2025.
When adding nodes using the Node Manager CLI tool, you must specify an Ethereum Wallet Address to receive the tokens your node earns, along with the Atbitrum one Network.
antctl add <as before> --rewards-address <wallet address> evm-arbitrum-oneevm-arbitrum-one must be added at the end. This is the blockchain Autonomi uses for data rewards and payments.
As a reminder, here's the full list of args your can include when adding nodes:
antctl add (with the following args)
  --count <# of nodes>      => If not specified, only a single node is added
  --rewards-address <your ethereum wallet address> evm-arbitrum-sepolia => Must be specified to store your earned attos. Note: this is also the address where your rewards will be paid after the TGE in after January 2025.
  --data-dir-path <path>    => optional, if you have a second hard disk where you want to store the data to.
  --log-dir-path <path>     => optional, path to store the log files.
  --home-network            => optional, if you're behind a NAT/home router/without port forwarding
  --upnp                    => optional, if you have enabled upnp in your router, mutually exclusive with home-network
  --node-port <single/range of ports> => If --home-network or --upnp is not provided, then you have to portforward a set of ports and provide them here. We accept a single port i.e., 12000 or a range i.e., 12000-12010. The number of ports here should match the number of nodes speicified using --count
--enable-metrics-server => optional, if you want the stats to be displayed inside the launchpadWhen you start your nodes they begin the work of providing resources to the Network, storing existing data chunks, and checking the work of other nodes too. By running nodes, you're already helping build the new Internet, right from the start, so thank you!
Nodes earn ANT when they receive and store some new data chunks when they are uploaded. Which nodes will receive the new data, and therefore the tokens, is entirely random. That's part of the security design of the Network.
What we can say, though, is that over time all nodes that are working reliably will eventually receive payments. It's just a matter of time. How long, depends on the size of the Network, and how much new data is being uploaded.
It's still worth checking that your nodes are operating properly, particularly if you are using a typical home router.
Some nodes operating from behind typical home network routers, and in particular those supplied by ISPs, often need a helping hand to get onto the Autonomi Network. Other nodes help them do this by acting as relays.
There is a known issue where the Network is being to conservative in allowing nodes to join through relays, meaning that some people are unable to have their nodes connect, and earn ANT, despite them getting them up and running.
You can check if this issue is affecting your nodes by taking a look at the logs.
This error can occur when trying to install the Autonomi Node Launchpad on Windows.
This typically happens with a new clean Windows install, or image, or when setting up a new computer for the first time.
Thankfully there is a simple solution: Install the Microsoft Visual C++ redistributable.
Some Window users are receiving the "Error adding new nodes. When trying run a node, we reached the maximum amount of retries (5)."
To solve this, hit the Windows key and search for "services.msc" and click it
Scroll down to "antnode"
Now hit the Windows key and type "CMD", and right click it to "Run as Administrator"
Type in CMD: "sc delete antnode1" (Note: you may need to do "sc delete safenode1" as well)
Do this for all the services you see in Step 2
Relaunch LP, reset your nodes, and start them back up.
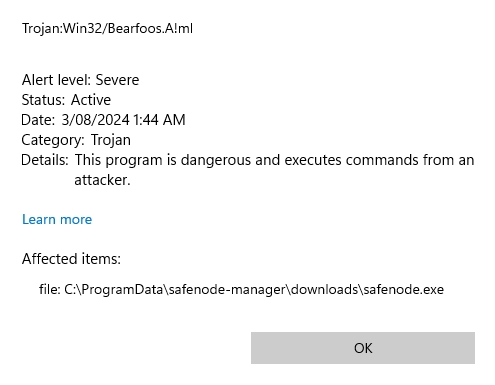
Occasionally, overzealous Windows antivirus software can block the installation of the Node Launchpad by flaggin the safenode.exe file.
Here's how your can disable the anti-virus software for the Node Launchpad, and safely install it
To remedy this, we need to disable the anti-virus software.
Head to Control Panel -> Systems and Security -> Windows Defender Firewall -> Turn Windows Defender Firewall on or off.
Now make sure to click the 2 boxes to turn off the firewall (pictured below), and click OK.
Once that is complete, you will be able to download and extract the node-launchpad.exe file.
Next, hit the Windows key and search for Virus & threat protection. Now click Manage settings (pictured below).
Now you need to click Add or remove exclusions (pictured below).
Now you need to click + Add an exclusion (pictured below) -> File -> then select the path of your EXE file.
Now turn your firewall back on (pictured below). Now you should be all set to run the EXE. Remembering to run it as an administrator.
If you're interested, or asked to, here's how to access the logs of the nodes running on your machine when you are using the Node Launchpad
In the Node Launchpad Press O to open the Options screen.
Press Ctrl + L. This will open the folder which contains all the log files for each node on your device.
Open the directory for the node you want to take a look at then open the 📁 logs folder. Inside you'll find the latest log file named antnode.log
You can open this to take a peek at the logs themselves, or forward it on to the support team if you need to.
The launchpad app itself also keeps logs. These are useful to access when the app crashes, or has other problems, and will help us fix and improve the experience. So if you are asked to provide these by a member of the team, here's how to do that
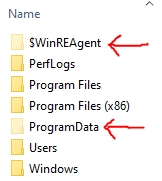
Some Window users experience Launchpad crashing a second after launching it. But have no fear, we have a fix for you!
If you can not locate some of these folders please make sure they are not hidden.
Delete the "safe" and "autonomi" folders found at:
C:\Users\YOURCOMPUTERNAME\AppData\Roaming\safe
C:\Users\YOURCOMPUTERNAME\AppData\Roaming\autonomi
Delete the following folders found at:
C:\ProgramData\safenode
C:\ProgramData\safenode-manager
C:\ProgramData\antnode
C:\ProgramData\antctl
C:\ProgramData\service-manager
Reinstall Launchpad and run it as a administrator
Autonomi nodes are designed to be run on everyday devices, so we can all contribute to an alternative future of the Internet with the devices we already have and not just rely on data centres and specialised equipment.
We’d encourage you to give it a go regardless of what system you are running. Members of our Forum community regularly operate nodes on everything from RaspberryPis, to gaming PCs, old laptops, and even some adapted phones!
But as a starting point, we’ve built the Node Launchpad to run on the following systems with ease.
Windows (Windows 10+), Mac (MacOS 14 Sonoma), and Linux (Ubuntu 24.04) computers with:
4 core CPU: Intel, AMD or Apple
8 GB ram
At least 35 GB spare hard drive space
8 Mbps Up/Down Internet service
You'll also need a Ethereum Wallet to receive and hold tokens earned by your node.
Any Ethereum address can be used here, but you'll need to set up a app in order to be able to see and use any tokens you earn.
We've got a on how to do that.
Unzip the download
The Node Launchpad will now open in a terminal window.
Press O to go to the Options screen.
Press Ctrl + B to in order to add your wallet address.
You’ll be prompted to accept the Terms & Conditions. Have a read, and if you are happy to continue Press Y.
Paste in your Wallet Address, and then Press Enter.
Now Press S to go back to the Status Screen
Then Press Ctrl + G to start some nodes.
Press the up and down arrows to choose the number of nodes you want to start, then Press Enter to start them. We’d recommend you start just one or two to begin. Each will use 35GB of storage space, some memory, CPU, and some of your internet connection. Then add more as your resources allow.
You’ll see the node(s) you’ve started appear in a list. They may take a few moments to start, but when they do they’ll turn green. They will be gathering data, then serving it to the Network. If you’ve added several nodes, you can scroll the list with the up and down arrow keys.
You’ll see the amount of storage space allocated, and the amount of tokens, or attos, they have earned in the Device Status panel.
Congratulations! You are up and running, and contributing to the Autonomi Network.
This is a common error many CLI users face, it is an easy fix. In the below instance, the user wanted to open 40 ports, but accidently opened 41 ports. Adjust the range from 45000-45040 to 45000-45039.
The time has finally come. With the long-awaited Token Generation Event behind us, the economy of the Autonomi Network is alive and kicking. Real are being earned by nodes, traded on , and used to upload and store data on the network.
If you're here for the first time and want to contribute some spare space—and earn ANT for doing so— you can follow our .
Or if you've already been running nodes on the Network until this point, here are the steps you need to take to get them connected and earning live tokens, and the follow-on steps needed to see ANT in your wallet.
It's vital, if you have been running nodes in the previous network and the beta, that you Reset rather than upgrade your nodes. Follow the steps below to do that.
Now that the Network is operating with real ANTs, you'll update your wallet to be able to see your tokens on the live network. You can keep the very same wallet address you have been using, but you'll need to , and then too.
The easiest way to contribute your spare capacity to the Autonomi Beta Network is with the Node Launchpad. It’s a small application that allows you to run several nodes on your computer that run in the background while you get on with other things.
If you are comfortable with Command Line Interfaces and want to run nodes on headless devices, or on more advanced setups such as virtual environments or remote servers, starting and managing many nodes at once, then try our .
The Node Launchpad is currently limited to 50 nodes per device. If you want to add more than 50 nodes on a single device (and you have the hardware to do it!) then you are probably a Power User who would benefit from using the .
If you're looking for a helping hand with running a node or getting on board with the beta, here's how to get support.
You can also report an issue and get direct team support right in Discord:
Use the /help command to report an issue and launch a DM thread with the support team.
You can contact the Autonomi team directly for support by emailing:
We are a small and busy team though, so please be patient, and kind!
We have a helpful, passionate and deeply knowledgeable community that often offers the most rapid support.
Ask for help via the dedicated , or in our longstanding .
Occasionally, you might need to reset the Nodes on your device. This might be if they have stopped functioning properly or if it's needed to update their code.
(Windows 10+)
As shown in the screenshot, the Launchpad appears to report an upload of 0, while downloads are visible. This is a graphical issue. Simply resize the Launchpad window to display the information correctly.
(Windows 10+)


Mac (MacOS 14 Sonoma)
Mac (MacOS 14 Sonoma)
Linux x86-64 (Ubuntu 24.04)
Linux ARM (Ubuntu 24.04)
Linux x86-64 (Ubuntu 24.04)
Linux ARM (Ubuntu 24.04)
Download the latest version of the Node Launchpad
Open the launchpad and Press O to access the Options screen.
Press Ctrl + R
Type the word reset and Press Enter.
Your nodes will reset and refresh in the background. Sometimes this can take a few moments.
Press Q to Launchpad, and then re-open it
Press Ctrl + G to add your Nodes again, and Press Enter to start them


Here's the series of commands for advanced users already using the Node Manager CLI tool: antctl.
After resetting, and while adding nodes again, note the additional arguments that should be used each time depending, on your circumstances. In particular the --rewards-address argument which allows you to attach your wallet address to each node. This is now using the Arbitum One network:
1. antup update (to make sure you are on the latest version of the Node Manager)
2. antctl reset
3. antctl add (with the following args)
  --count <# of nodes>                                              => If not specified, only a single node is added
   --log-dir-path <path>                                             => optional, path to store the log files.
  --home-network                                                    => optional, if you're behind a NAT/home router/ without port-forwarding
  --upnp                                                            => optional, if you have enabled upnp in your router, mutually exclusive with home-network
  --node-port <single/range of ports>                               => If --home-network or --upnp is not provided, then you have to port-forward a set of ports and provide them here. We accept a single port i.e., 12000 or a range i.e., 12000-12010. The number of ports here should match the number of nodes specified using --count
  --enable-metrics-server                                           => optional, if you want the stats to be displayed inside the launchpad
  --rewards-address <your ethereum wallet address> evm-arbitrum-one => Must be specified at the end, to store your earned ANT.
4. antctl start --interval 2000
5. antctl status --details1. antup update (to make sure you are on the latest version of the Node Manager)
2. antctl reset
3. antctl add (with the following args)
--count <# of nodes> => If not specified, only a single node is added
--log-dir-path <path> => optional, path to store the log files.
--home-network => optional, if you're behind a NAT/home router/ without port-forwarding
--upnp => optional, if you have enabled upnp in your router, mutually exclusive with home-network
--node-port <single/range of ports> => If --home-network or --upnp is not provided, then you have to port-forward a set of ports and provide them here. We accept a single port i.e., 12000 or a range i.e., 12000-12010. The number of ports here should match the number of nodes specified using --count
--enable-metrics-server => optional, if you want the stats to be displayed inside the launchpad
--rewards-address <your ethereum wallet address> evm-arbitrum-one => Must be specified at the end, to store your earned ANT.
4. antctl start --interval 2000
5. antctl status --details


